Remote IoT On Mac: Secure & Easy Setup Behind Firewalls & Routers
Is it possible to remotely access your Internet of Things (IoT) devices from your Mac, even when navigating the complexities of firewalls and network restrictions? The answer, thankfully, is a resounding yes, and this guide will illuminate the path to achieving secure and seamless connectivity, regardless of your location or the sophistication of your network setup.
The allure of remote access to your IoT devices is undeniable. Whether it's monitoring your smart home, managing industrial equipment, or simply keeping tabs on a remote project, the ability to connect from anywhere offers unparalleled convenience and control. However, the path to achieving this access isn't always straightforward, especially when you introduce the complexities of firewalls, routers, and the inherent security concerns that come with remote connections. Mac users, in particular, often face unique challenges when setting up these connections, particularly when they choose not to rely on Windows-based solutions. This article delves deep into the strategies, tools, and techniques required to establish reliable and secure remote access to your IoT devices from your Mac, eliminating the roadblocks that often frustrate this process.
The modern landscape of network security is a multifaceted battleground. Firewalls, essential guardians of our digital perimeters, are designed to scrutinize and control incoming and outgoing network traffic. They examine the source, destination, and characteristics of each data packet, deciding whether to allow or deny its passage. This strict control, while crucial for protecting our networks from malicious threats, can inadvertently hinder legitimate connections, especially when it comes to the dynamic world of IoT devices and remote access. Routers, the gatekeepers of our home and office networks, further complicate matters. They often employ Network Address Translation (NAT) to translate private IP addresses into public ones, adding another layer of complexity to the process of establishing external connections to devices within the network. Moreover, the practice of MAC address filtering, once considered a security panacea, is now recognized as an insufficient measure against sophisticated attacks, and it can often complicate legitimate remote access attempts.
Given these potential hurdles, many users find themselves asking: How can I securely access my IoT devices from my Mac, even when facing firewall restrictions or the absence of MAC address filtering? The good news is that with the right knowledge and a strategic approach, these challenges can be overcome. We will unravel various methods, tools, and techniques to ensure that your remote access setup is not only functional but also secure, safeguarding your data and your devices from unauthorized access. Well explore the power of SSH tunneling, the importance of port forwarding (and alternative methods when its not an option), and the vital role of understanding your network configuration. By understanding these methods, you can create a robust and reliable system for accessing your IoT devices securely from your Mac, no matter where you are.
Before we dive into the detailed steps, let's quickly address the core components and concepts that underpin a successful remote access setup. You need to be clear on these building blocks to create a secure and stable connection.
Understanding Your Network Configuration: A deep understanding of your home or office network is paramount. You need to know your router's IP address, subnet mask, and gateway. You should also identify the public IP address assigned to your internet connection. These details are crucial for configuring port forwarding and creating secure tunnels.
Identifying Your IoT Devices: Every IoT device has a unique identifier: its MAC address. Locate this address. It is usually printed on the device itself or in its accompanying documentation. This identifier is important for whitelisting the device on your router. If your device requires a static IP address, set that IP address in your router's configuration.
Secure Shell (SSH): The Foundation of Secure Tunneling Secure Shell (SSH) is a network protocol that provides a secure channel for communication over an unsecured network. It's widely used for remote login, command execution, and, most importantly, creating secure tunnels. SSH tunnels encrypt all data that passes through them, making them a secure way to access remote devices.
Port Forwarding vs. Alternative Approaches: Port forwarding, the process of directing incoming network traffic on a specific port to a specific device within your network, is a common method for enabling remote access. However, it's not always the only option or the most preferred. We will explore how to set up port forwarding when possible and also the alternative ways to connect if port forwarding becomes problematic.
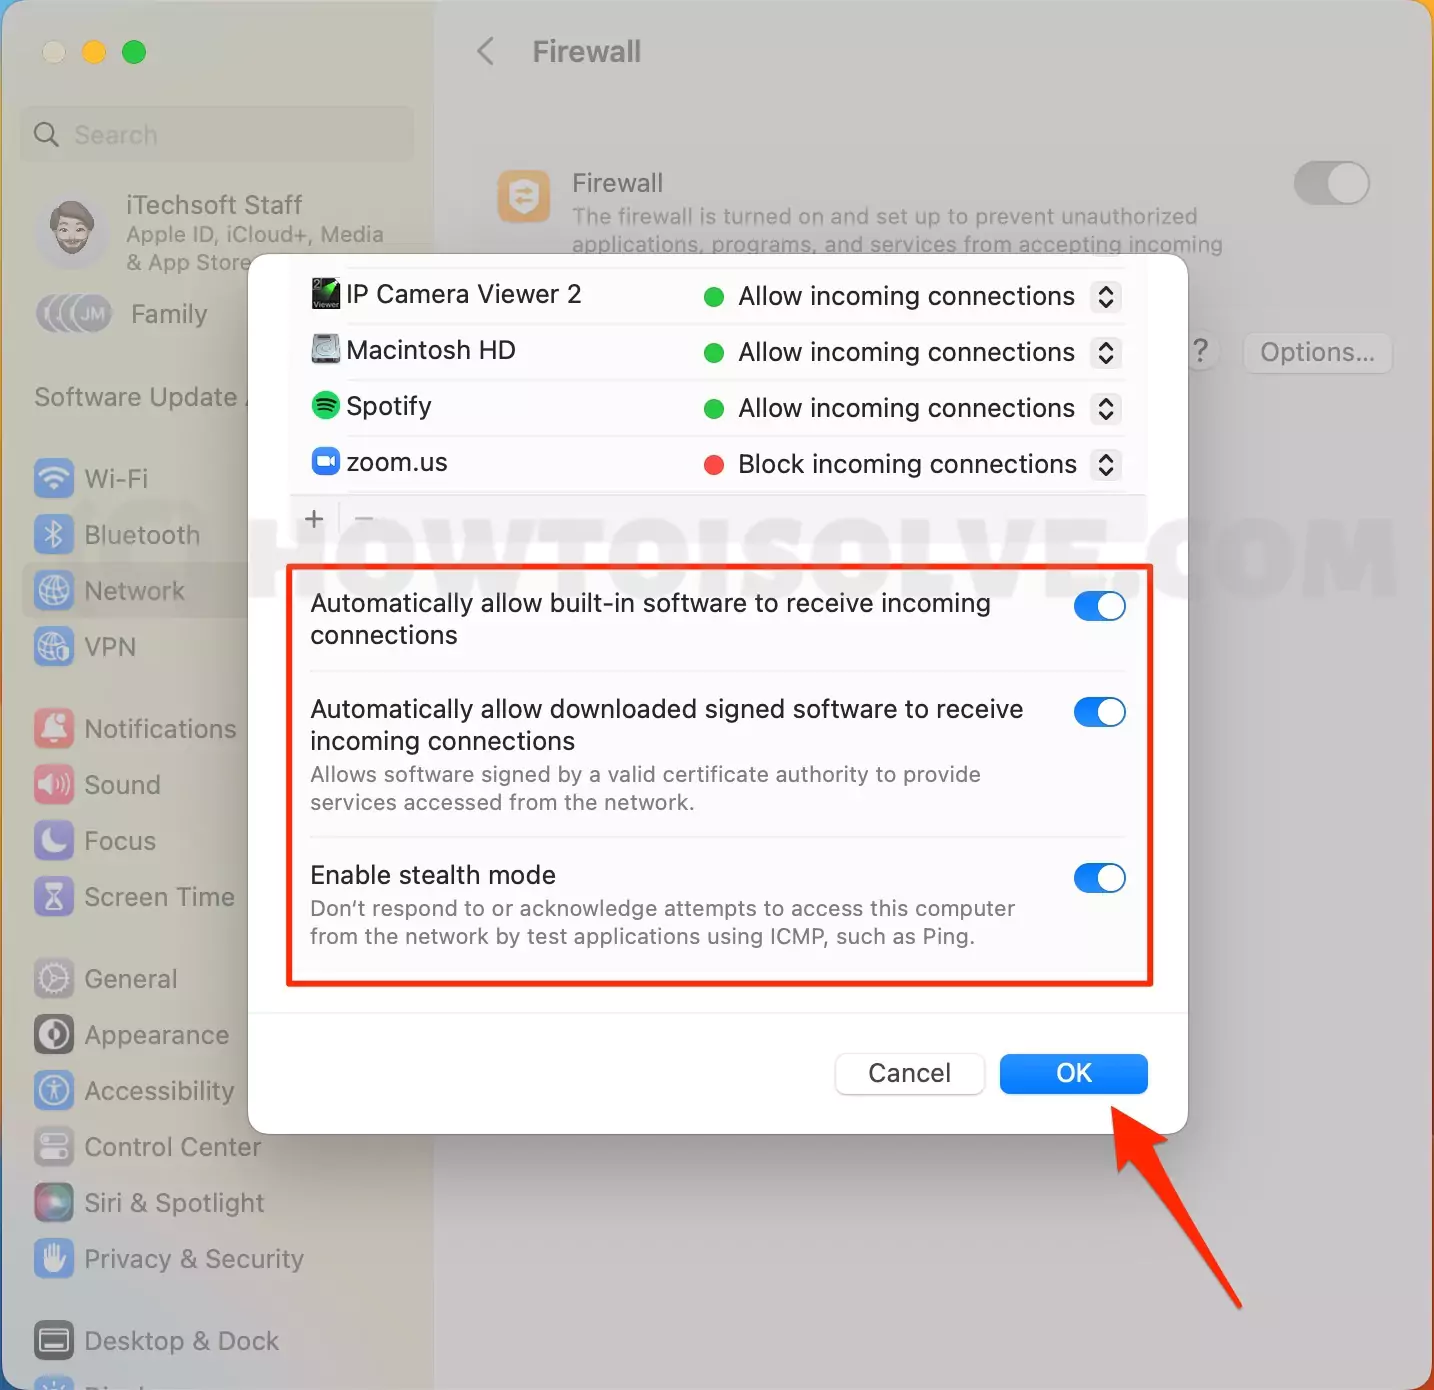
Firewall Configuration: Your firewall, a critical line of defense, can sometimes block legitimate connections. You need to configure it to allow incoming connections on the ports you are using. In some cases, you may need to configure it to accept connections from a specific source IP address. Well detail how to make sure your firewall doesn't obstruct remote access, while still protecting your devices.
| Category | Details |
|---|---|
| Goal | To establish a secure and efficient remote connection to IoT devices using a Mac, bypassing the challenges of firewalls and network restrictions. |
| Objective | To guide users through various tools and methods, ensuring seamless connectivity while maintaining security and functionality. |
| Target Audience | Mac users who are working remotely or managing IoT devices, and are seeking to securely access their devices from any location. |
| Key Aspects |
|
| Methods |
|
| Benefits |
|
| Tools |
|
| Reference Link | Example Remote IoT Setup Guide (Replace with a valid and authentic resource) |
One of the most robust and secure methods for connecting to your IoT devices remotely is by using Secure Shell (SSH) to create a secure tunnel. SSH creates an encrypted connection between your Mac and your IoT device, ensuring that all the data transmitted is protected from eavesdropping or tampering. The following steps outline the process, making it accessible to both beginners and seasoned users:
Step 1: Preparing Your IoT Device Ensure that your IoT device has SSH enabled. This feature may be enabled in the device's settings or through its configuration interface. You will need the device's IP address and its SSH username and password to connect.
Step 2: Setting up SSH Tunnel on your Mac Open the Terminal application on your Mac (found in /Applications/Utilities/). Use the following command to set up an SSH tunnel. This assumes the device is on your local network and accessible via the IP address 192.168.1.100 and port 22:
ssh -L 8080:192.168.1.100:80 user@your_iot_device_ip
In this command:
- -L 8080:192.168.1.100:80: This establishes a tunnel. All traffic on port 8080 on your Mac will be forwarded to port 80 on the IoT device at the specified IP address. You can change the port numbers as per your needs.
- user@your_iot_device_ip: Replace user with the username you use to log into your IoT device via SSH and replace "your_iot_device_ip" with the IP address of the IoT device. For example, ssh pi@192.168.1.100
- You will be prompted for the password of the user on the IoT device. Enter the password.
- If successful, you will be connected via SSH. The terminal will likely display a prompt indicating you're logged into the device.
Step 3: Accessing the IoT Device through the Tunnel Once the tunnel is established, any service running on your IoT device (such as a web server on port 80) can be accessed through your Mac's localhost. For example, if your IoT device has a web interface, you would access it by opening a web browser on your Mac and going to http://localhost:8080. Remember to replace 8080 with the port number specified when creating the tunnel (in the above example).
Step 4: Maintaining the SSH Tunnel The SSH tunnel will remain active as long as the SSH session in the terminal is open. If you close the terminal window, the tunnel will also close. You can leave the terminal open in the background.
Step 5: Securing Your SSH Connection For improved security, always use strong passwords. Moreover, consider using SSH keys instead of passwords. SSH keys are more secure than passwords, and setting them up involves generating a key pair and then adding the public key to the authorized_keys file on your IoT device.
Port forwarding is a traditional and direct method to facilitate remote access, if your router setup allows it. This method involves configuring your router to forward incoming traffic on a specific port to your IoT device's internal IP address. Heres a step-by-step guide to configuring port forwarding for your IoT devices:
Step 1: Accessing Your Router's Admin Panel
Open a web browser on your Mac and enter your routers IP address. Common router IP addresses include 192.168.1.1 or 192.168.0.1. If these addresses don't work, check your router's documentation or perform a web search. You may be prompted to enter your routers username and password. This information can usually be found on a sticker on the router itself or in the router's manual. If you have changed your login credentials, use those instead.
Step 2: Locating the Port Forwarding Section
Navigate to the port forwarding or virtual server section of your routers configuration. The exact location varies depending on the router's make and model. Common places to find this section are under the Advanced Settings, WAN Settings, or Security menus. Look for options like "Port Forwarding," "Virtual Servers," or "Application Forwarding."
Step 3: Creating a Port Forwarding Rule
Add a new port forwarding rule with the following details:
- Service Name: You can name it something descriptive, such as "IoT_Device_Web" or similar.
- Protocol: Choose TCP, UDP, or both. If your device uses HTTP, use TCP. If it uses a more complex protocol, you may need to use both. Consult the documentation for your IoT device.
- External Port: This is the port on your router that will be used to access your device from the internet. This could be any available port number above 1024. Ensure this port is not already in use. Common ports: 80 (HTTP), 443 (HTTPS), or a custom port.
- Internal Port: This is the port on your IoT device that you wish to access. It is often the default port for the service running on your IoT device (e.g., 80 for a web server).
- Internal IP Address: Enter the internal IP address of your IoT device. This is the private IP address assigned to your device within your local network (e.g., 192.168.1.100).
Step 4: Applying the Settings
Save the settings. Your router will apply the rule, and traffic arriving on the specified external port will be forwarded to the specified internal IP address and port.
Step 5: Testing the Connection
To test the connection, use a web browser (if your device has a web interface) or an SSH client from an external network (like your mobile phones data connection, another network that is not the same network as your IoT device). Use your public IP address followed by the external port. For instance, if your public IP is 123.45.67.89, and you used external port 8080, you would try to access your device via http://123.45.67.89:8080.
Important Considerations for Port Forwarding
- Security: Port forwarding can create security risks if not managed carefully. Only forward the minimum necessary ports and be sure to secure your IoT device. Change default passwords, and keep its firmware up to date.
- Static IP Address: For consistent access, assign a static IP address to your IoT device within your router's settings. This ensures the device's IP address doesn't change, thus maintaining the port forwarding configuration.
- Public IP Address: Your public IP address is assigned by your internet service provider (ISP) and can change. If it changes, you'll need to update your access methods. Consider using a dynamic DNS service (DDNS) to automatically update your domain name with your current IP address.
However, port forwarding is not always feasible or preferred. Some routers may have limitations or specific security configurations that make it difficult. In such cases, alternative methods are essential to bridge the gap and establish a remote connection to your IoT devices. These methods provide flexibility and adaptability, offering a more comprehensive approach:
Reverse SSH Tunneling This technique is especially useful when your IoT device is behind a firewall that blocks incoming connections. It involves the IoT device initiating the SSH connection to your Mac, and establishing the tunnel. This method is the same as creating an SSH tunnel, but in reverse. The setup requires an SSH server on your Mac, which means your Mac must have a static public IP address or have a dynamic DNS setup. This solution allows the IoT device to initiate the connection, bypassing the need for port forwarding.
VPN Solutions: VPNs can offer a secure, encrypted tunnel for accessing your network. There are many VPN providers available, but you can also set up your own VPN server on a Mac. Setting up a VPN can offer the benefit of accessing not just one but all the devices connected to your local network.
Cloud-Based Solutions and Services: Consider solutions offered by third-party cloud service providers, such as AWS IoT, Azure IoT Hub, or other platforms that provide remote access and management capabilities. These platforms offer pre-configured features for managing and securing your IoT devices, often eliminating the need for complex network configurations. Many offer free tiers for light use. This method is a good option if you do not want to configure settings on your own.
Remote Desktop Solutions: Tools like VNC (Virtual Network Computing) or RDP (Remote Desktop Protocol) are used for accessing the desktop interface of your IoT devices. If your device supports a graphical user interface, setting up VNC or RDP provides remote access to its entire desktop environment. This requires proper configuration of the devices, the router, and the firewall, as well as ensuring security measures like strong passwords and encryption.
Using a Relay Server: A relay server can facilitate communication between your Mac and your IoT devices. This can be useful when both your Mac and IoT devices are behind restrictive firewalls. The devices connect to the relay server, which acts as an intermediary, forwarding data between them.
To illustrate the steps to implement the alternative methods, consider setting up reverse SSH tunneling:
Step 1: Configure SSH Server on Your Mac Ensure SSH is enabled on your Mac. Open System Preferences, go to "Sharing," and enable "Remote Login." If your Mac has a dynamic IP, set up a Dynamic DNS (DDNS) service to keep your domain name updated with your current IP address. Create an SSH key pair on your IoT device to facilitate secure authentication.
Step 2: Initiate the SSH Connection from Your IoT Device On your IoT device, use the following command: ssh -R 2222:localhost:22 user@your_mac_ip.
- Replace 2222 with a port number on your Mac that isn't already in use. This is the port that will receive incoming connections from the IoT device.
- Replace localhost:22 with the address and port where you want to connect to the SSH server on the IoT device (usually port 22).
- Replace user@your_mac_ip with your macOS username and IP address.
Step 3: Accessing Your IoT Device Remotely From any device with network access, connect to your Macs public IP and port 2222 using SSH. ssh user@your_mac_ip -p 2222 This will tunnel the connection from the remote device (your Mac) to the IoT device.
Step 4: Security Considerations for Reverse Tunneling: Similar to standard SSH tunneling, enforce strong passwords and consider using SSH keys for authentication. Update the system on the IoT device, your Mac, and the related software.
When you are managing IoT devices, security should never be an afterthought. It is a cornerstone of any successful remote access strategy. Implementing strong security practices from the outset is crucial to protect your devices, data, and network from potential threats. Here are some of the most important strategies and security best practices to bear in mind.
1. Strengthen Authentication
- Use Strong Passwords: Generate strong, unique passwords for each of your IoT devices and user accounts. Ensure that these passwords have a high level of complexity. Utilize a password manager to manage and store your passwords securely.
- Enable Multi-Factor Authentication (MFA): Implement MFA on your devices where available. MFA adds an extra layer of security by requiring verification through another method, like a one-time code from a mobile app or SMS. This ensures that even if the password is compromised, the attacker will not be able to log in.
- Implement SSH Keys: Configure SSH key-based authentication instead of password-based authentication. SSH keys are cryptographically more secure than passwords.
2. Network Security Best Practices
- Keep Firmware Up-to-Date: Regularly update the firmware of all IoT devices and the router itself to patch security vulnerabilities. Firmware updates often contain important security fixes. Automate the updates wherever possible.
- Firewall Rules: Configure the firewall on your Mac and router to block all unnecessary incoming connections. Only allow the specific ports needed for remote access. Enable intrusion detection and prevention systems where available.
- Network Segmentation: If possible, segment your network by isolating your IoT devices on a separate VLAN (Virtual LAN). This limits the impact of a security breach and prevents malicious actors from accessing the rest of your network.
- MAC Address Filtering is Not Enough: While MAC address filtering can be used as an additional layer of security, it should not be your primary defense. MAC addresses can be spoofed.
3. Data Encryption and Privacy
- Use Encryption: Always encrypt the data transmitted between your Mac and your IoT devices. SSH tunnels and VPN connections provide encryption. If you are accessing a web interface, use HTTPS (SSL/TLS) to encrypt web traffic.
- Data Minimization: Collect only the data required to perform your intended tasks. Limit the amount of personal or sensitive data that is stored or transmitted by your IoT devices. Review privacy policies of your IoT devices and services.
4. Regular Security Audits and Monitoring
- Perform Regular Audits: Regularly audit your devices and network to identify potential vulnerabilities. Conduct vulnerability scans and penetration testing to test your security posture.
- Monitor Network Traffic: Monitor network traffic for suspicious activity. Use network monitoring tools to detect unusual behavior or unauthorized access attempts.
- Log Everything: Keep detailed logs of all access attempts, security events, and configuration changes. Log data can be used to identify and respond to security incidents. Analyze your logs regularly to look for anomalies.
5. Physical Security
- Secure Access Points: Restrict physical access to your IoT devices. Ensure that the devices are physically protected to prevent tampering or unauthorized access. Place them in a secure area.
- Disable Unused Ports and Services: Disable any unused ports and services on your IoT devices and router. Reducing the attack surface can limit the ways malicious actors can gain access.
6. Stay Informed
- Stay Updated: Keep up-to-date on the latest security threats and vulnerabilities. Follow security blogs, forums, and alerts to stay informed. Participate in security training to understand the current trends. Subscribe to security advisories from vendors, and cybersecurity agencies.
7. Backup and Recovery
- Regular Backups: Regularly back up your device configurations and data. In case of a security incident or data loss, having backups will allow you to restore the system.
- Develop an Incident Response Plan: Create an incident response plan. Define the steps for handling a security breach, data loss, or other security incidents. Practice the plan. Knowing what actions to take will minimize the impact of a breach.
By implementing these security best practices, you will be able to secure your IoT devices on your Mac and maintain your access.
Understanding and employing remote access to your IoT devices on a Mac can seem daunting, but with the right approach, it becomes a manageable and invaluable skill. Mastering this technology empowers you with control and freedom, connecting you to your devices regardless of location. The combination of security, efficiency, and flexibility makes it an indispensable tool in our increasingly connected world.


 devices from your Mac, even when navigating the complexities of firewalls and network restrictio)